The document immediately below concentrates largely on the basic mechanics of how to actually run a web-HUMAN patient.
A link at the page bottom leads to an in depth tutorial on the more advanced and novel aspects of how to run and diagnose patients.
Introduction-overview
The original Patient section in the Coleman (and Coleman/Randall) HUMAN model has been expanded in web-HUMAN to allow for new physiological learning capabilities.
The new features include 1) a mode with open access to all physiological variables, 2) a Hints section that leads the user down one or more useful investigative pathways and 3) an analysis/ diagnosis section that shows the user how the case was created in HUMAN and sometimes explains the relevance of the results obtained by the user of the Hints procedures and how to possibly stabilize ("cure") the condition.
The general framework of how to run a patient is stressed immediately below while the use of the newer features is described in the tutorial linked to at the bottom of this document.
I. How to run a web-human patient
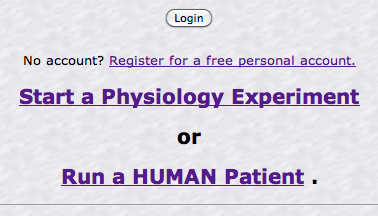
At the opening screen select the Run a HUMAN Patient option (see below)
This leads to the main patient selection screen (see below)
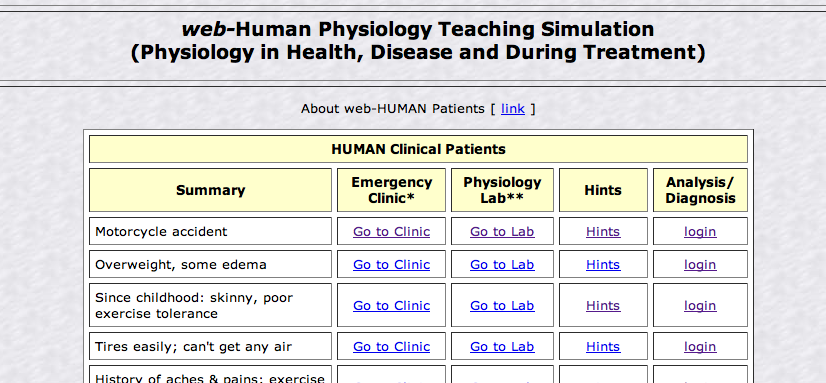
Each of the five major options (Summary, etc.) in this table are described below or in the next document.
Note that the second ("Clinic*") and third ("Lab**") options are ones that actually run a Patient.
A] Summary - column one
Identifies the patient, almost always exclusively via symptoms.
These patient descriptions replace the previous numerical (e.g. Patient #1) or name only (e.g. Mr. Otto Regulation) designations.
They derive their information from the <Your Patients Chart> section of the model but sometimes add additional helpful non-chart derived information/hints.
B] Emergency Clinic* - column two
This links actually runs the selected patient within the HUMAN model and then leaves the user to puzzle out, from further model-derived information, the diagnosis. Always ask for <Your Patients Chart> at the first available opportunity.
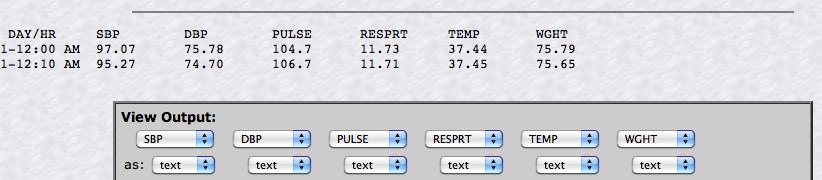
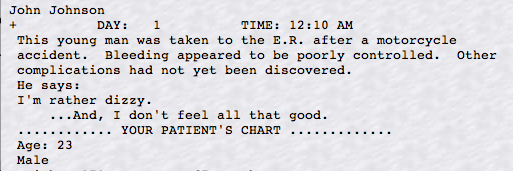
See below for the results of clicking on Go to Clinic for the 'Motorcycle accident' patient.
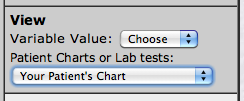
Notice that initially only vital sign information is presented (see above) and that more information can be derived by next selecting <Your Patients Chart> and simply clicking the <Go> option.
 |
 |
C] Physiology Lab** - column three
The same above outlined procedure holds also for the Go to Lab (column 3) option.
This link also actually runs the selected patient within the HUMAN model and presents the user with an identical initial vital signs readout.
What about the Hints, Analysis/Diagnosis and differences between the Clinic* and Lab** options?
To learn more about these newer features of the Patients section click on the link to the right (learn more).