
web-HUMAN 6
A Sample Use of the New Save/Retrieve Capability
Create a New Patient
Note: The document below teaches patient save/retrieve in workshop (screen by screen) format. It was written for Human 6 which differs from Human 6.1 only in the lack of within-the-model on-line help. A refresher page summarizing the differences between 6.0 & 6.1 screen formats is available here.
Note 2: The material below assumes the user has been through the basic web-HUMAN 6 tutorial, is logged in a a registered user (save/retrieve requires login) and also assumes a basic familiarity with running web-HUMAN. Step by step tutorials for each set of skills can be found on the main Help page.
1) Start the model afresh. You again see the opening web-HUMAN screen below.
Note that web-HUMAN also contains Patients and that it is possible to select these to work on (see above left).
After noting this, click on the <Run> button to get the basic web-HUMAN experimental controls (see below).
With the new web-HUMAN 6 Save/Retrieve experiment capability it is now possible to create your own Patients (or any unique physiological state) by these simple 3 steps.
This is almost exactly the method used by Dr. Coleman in creating these web-HUMAN
patients to begin with.
2) An example- Set up to create a pheochromocytoma patient
Such a patient already exists in web-HUMAN (Patient #9)* but we will now create that patient from scratch. A pheochromocytoma is tumor of adrenal medullary tissue derivation and as such overproduces sympathetic substances.
* For more on the use of this patient in a teaching situation go to Help / Simulations from Courses / Cardiovascular Physiology.
3) Actual patient setup
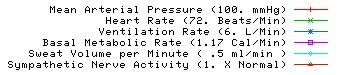
In the View
Output: section set the six variables via mouse selection
on their menus to
AP, PULSE, VENT, BMR, SWETV, SYMPNA as show directly below.
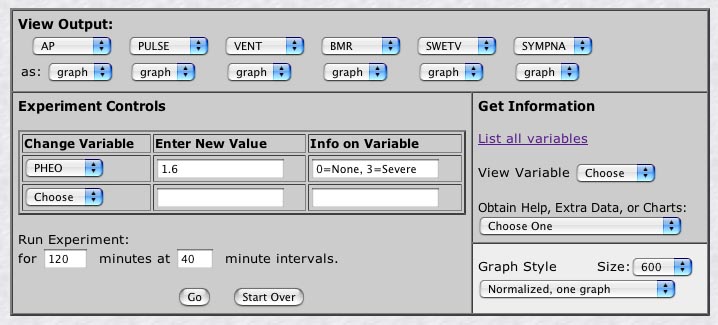
These web-HUMAN abbreviations stand for the following variables (see below) and are obviously set up to read out some consequences of over stimulation of the sympathetics by the chromaffin tumor.
Also set all six variables to be graphed (see above). This will thus yield both a graphic and tabular output of the results.
Under the Change Variable section (see above) mouse the upper menu to PHEO* and set it to 1.6, thus creating a moderately severe tumor.
Under Run Experiment enter 120 minutes and 40 minute intervals.
Click the <Go> button to run the simulation.
*Note that PHEO is one of many pathology inducers included in web-HUMAN. The use of these is detailed under Help / Help for variables.
4) You see a graphic and a tabular output. Click on the tabular output to bring it to the foreground as below.
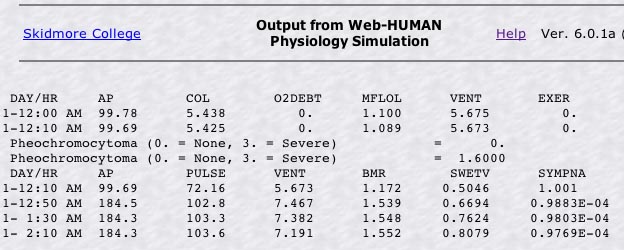
Examining the table we see, from left to right, hypertension, tachycardia, hyperventilation, raised basla metabolic rate, profuse sweating and a drop in the remaining sympathetic activity of the body. This complex of symptoms is characteristic of a pheochromocytoma.
5) Now click on the graph to bring it to the foreground. We see the graph below.

Note the elevation of all the variables already discussed and the drop in native sympathetic activity.
If we save now, upon retrieval this is exactly what your students will see when they call the Saved file back.
6) Save the file
At the bottom of the tabular screen find the choice
Save this experiment
(see below) and click on it.

In the box that appears give it a title and description that are appropriate for your future users of the file and click the <Save> button.
7) To check on retrieval, now click on Get a saved experiment and you will see choices like those below.

Locate the file indicated (Create a New Patient) and click on Run this model.
Voila! The model reappears for your users.
Click on your browser's <Back> button returning you to the screen above and then click on the More info link.
8) The
Information ... saved with the file appears. Here you would
put your own information for use by your students. Read through the possibilities.
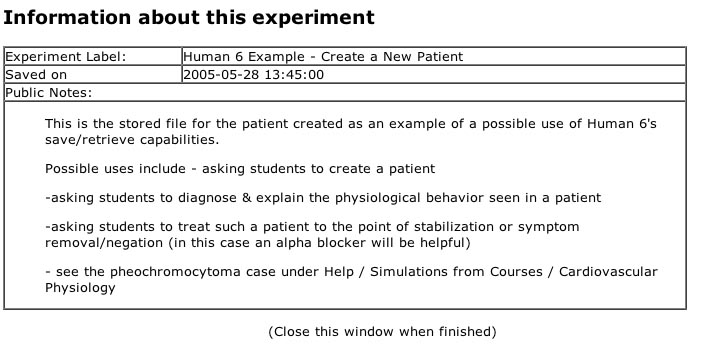
Close the window when done.